Outlook 2010 email setup tutorial - Cloud/cPanel Subscription
Before you can configure email software to send and receive emails from our servers, you must
- Purchase a cPanel or Cloud hosting subscription service.
- Create an email account on our cPanel or Cloud hosting servers.
- Ensure you have your incoming, outgoing, username and password details ready to go
Once you have done this, you may configure your email software to connect to the email account you created on our servers.
Setup An Email Account In Outlook 2010 Video Tutorial
Setup An Email Account In Outlook 2010 Website Tutorial
| Action | Screenshot | |
|---|---|---|
| 1 | Open Microsoft Outlook 2010. Click File. Select Info from the drop down menu. Click Account Settings. Select the Add and remove accounts option from the drop down. | 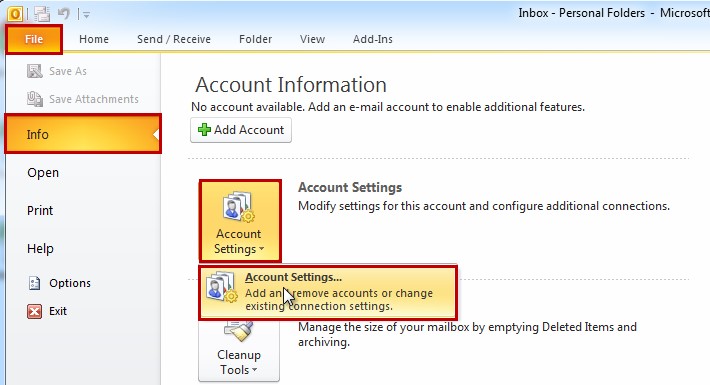 |
| 2 | Under the Email tab, click New. Modifying the settings for an existing account? If making changes to an existing account, under the Email tab you will see a list of email accounts that exist within Outlook 2010, double click on the email account you wish to make changes to | 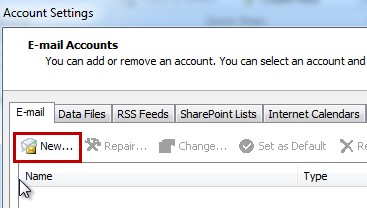 |
| 3 | Select Email Account radio option and complete the following information: Your Name: The name you wish displayed when people receive your emails Email Address: The email address you are sending email from. Password: The password used for this email account. Re-type Password: The password used for this email account. Select Manually configure server settings or additional server types then click [Next]. | 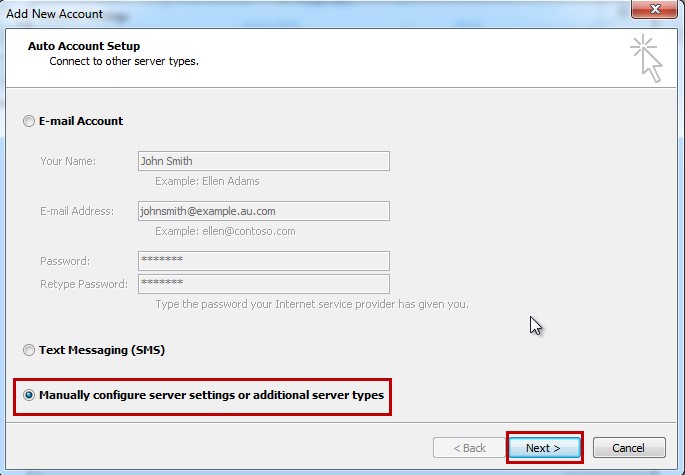 |
| 4 | Cloud subscriptions only: Complete the following information Your Name: The name you wish displayed when people receive your emails Email Address: The email address you are sending email from. Account Type: Select POP3 or IMAP from the drop down. Incoming mail server: POP: pop. example.com.au IMAP: imap.example.com.au where example.com.au is your domain name. Outgoing mail server: smtp.example.com.au where example.com.au is your domain name or you can enter your Internet Service Provider’s (ISP) outgoing mail server. User Name: Your full email address. eg. [email protected] Password: The password used for this email account. Click [More Settings]. | 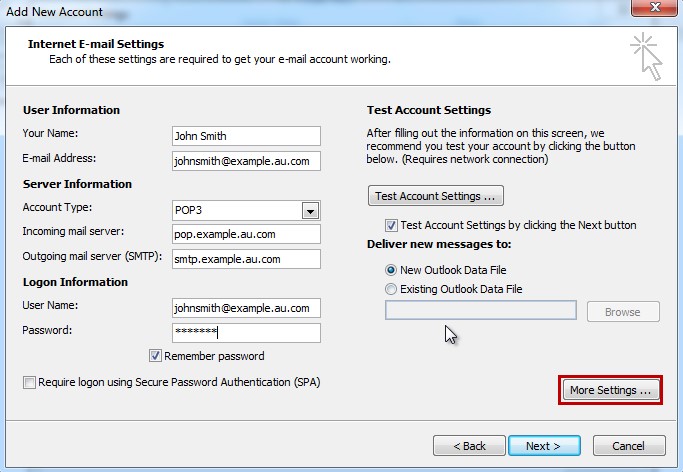 |
| 4 | cPanel subscriptions only: Complete the following information Your Name: The name you wish displayed when people receive your emails Email Address: The email address you are sending email from. Account Type: Select POP3 or IMAP from the drop down. Incoming mail server: mail.example.com.au where example.com.au is your domain name. Outgoing mail server: mail.example.com.au where example.com.au is your domain name or you can enter your Internet Service Provider’s (ISP) outgoing mail server. User Name: Your full email address. eg. [email protected] Password: The password used for this email account. Click [More Settings]. | |
| 5 | Select the Outgoing Server tab. Select My outgoing mail sever (SMTP) requires authentication and Use same settings as incoming mail server. | 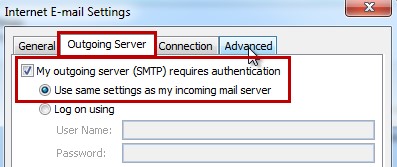 |
| 6 | Select the Advanced tab. Users can choose whether to use SSL or not, both are support on our servers. Without SSL Encryption This server requires an encrypted Connection (SSL) = Unselected. POP: Non SSL= 110 IMAP: Non SSL= 143 Change the Outgoing server (SMTP) number to 587. Use the following type of encrypted connection = None. Click [OK]. Click [Next] then [Finish]. This completes the setup of your email account in Outlook 2007. | 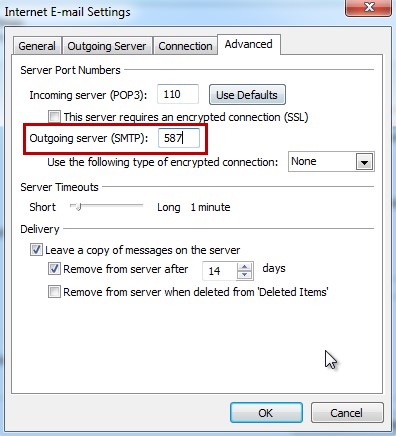 |
| 6 | Select the Advanced tab. Users can choose whether to use SSL or not, both are support on our servers. With SSL Encryption This server requires an encrypted connection (SSL) = Selected. POP: SSL= 995 IMAP: SSL= 993 Change the Outgoing server (SMTP) number to 465. Use the following type of encrypted connection = SSL. Click [OK]. Click [Next] then [Finish]. This completes the setup of your email account in Outlook 2007. |  |
Success! You’ve done the steps for this article. If you’re unable to follow these steps, or receive an error in doing so, please contact our support team
Updated 3 months ago