My emails are going to people's spam or junk folder (cPanel)
There are several reasons why your emails might be rejected or go to people's spam or junk folders. This article will cover two common causes and how to fix them.
Quick Fix
Add the following SPF record (please add this record as TXT):
v=spf1 +a +mx +include:_spf.server-cpanel.com +include:relay.mailchannels.net ~all
Click here to find out how to add this record.
SPF Record
A Sender Policy Framework (SPF) record is an email authentication method. It lets you specify which servers are allowed to send emails using your domain. That way, when you send an email, the recipient's server is more likely to accept it as a legitimate email and not reject it or mark it as spam.
That's why you should always have an SPF record.
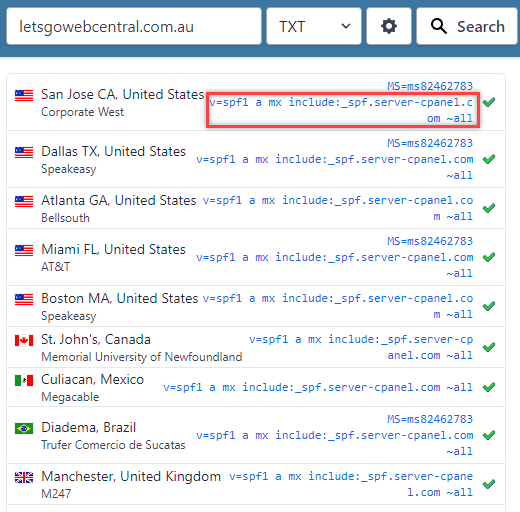
How to check if you have an SPF record
If your sent emails are being rejected or going to your recipient's junk or spam folder, check if you have an SPF record.
- Go to whatsmydns.net (click here)
- Type in your domain name where it says www.example.com
- Make sure TXT is selected
- Click Search
You are looking for a record that begins with v=spf1
How to check your DNS host
If you do not have an SPF record, you can add one to your DNS host - this is where your Name Servers are pointing.
To check if you are using cPanel as your DNS host, search your domain using a WHOIS lookup. If your name servers are pointing to NSx.SERVER-CPANEL.COM and NSx.MYSECURECLOUDHOST.COM then cPanel may be your DNS host. If they are pointing elsewhere, you can contact your DNS host for assistance.
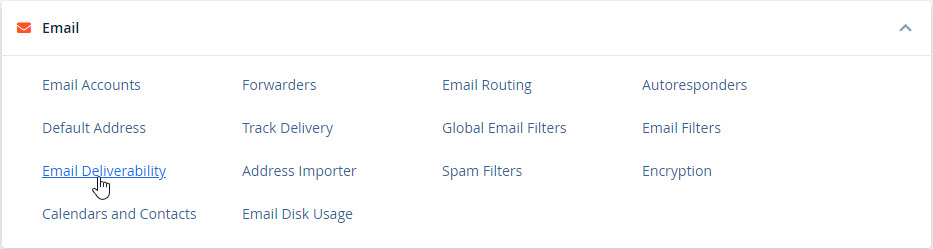
How to automatically detect and repair your SPF record in cPanel
The Email Deliverabilitymenu in cPanel will automatically detect your cPanel SPF record and recommend the correct record. This will only work if you are using cPanel emails and your Name Servers are pointing to cPanel.
- In the cPanel main menu click Email Deliverability
- Your domains and subdomains will be listed here. Under Email Deliverability Status, it will highlight any detected problems

- To quickly apply the suggested fix, click Repair

- The suggested fix will appear, click Repair
You can also Customise or Copy the record.
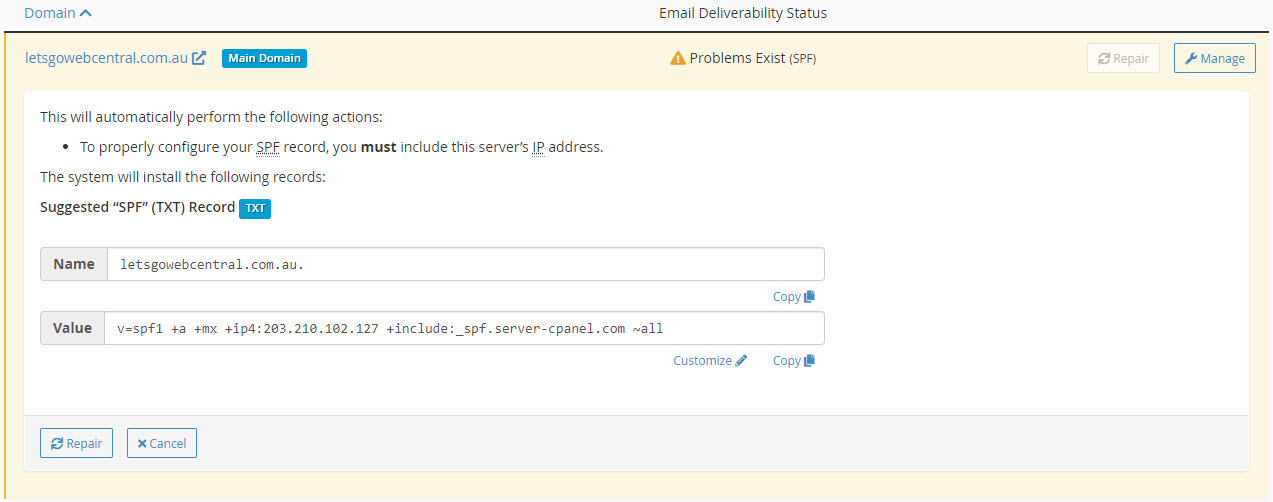
- The record has now been installed and after a few seconds a green tick and the word Valid will appear under Email Deliverability Status (unless cPanel has detected other issues)

Please note, that after adding a TXT record it may take up to 4 hours to take effect.
How to manually add an SPF record in cPanel
If you need to manually add an SPF record in cPanel, you can do so in the Zone Editor.
- In the cPanel main menu click Zone Editor

- To the right of the domain click Manage
- Click +Add Record

- Under Type, click the drop-down menu and click TXT
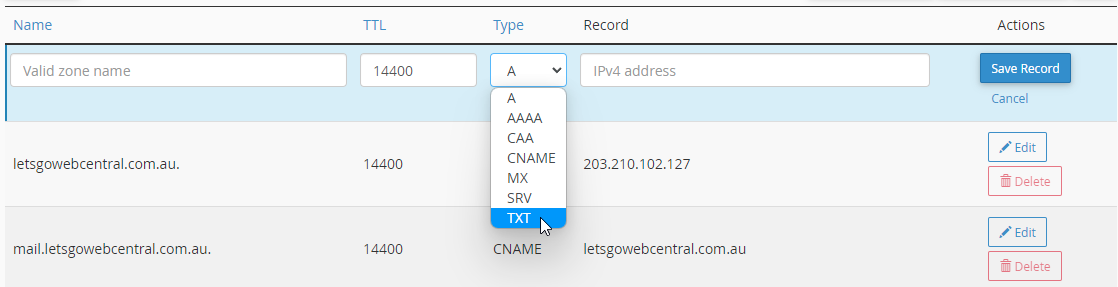
- Under Name, type in your domain name
- Leave the TTL as 14400
- Under Record, type in the SPF record
If you are using cPanel emails then copy and paste the following record:
v=spf1 +a +mx +include:_spf.server-cpanel.com +include:relay.mailchannels.net ~all
If you are using a different email service, talk to your email hosting provider for the correct SPF record.
- Click Save Record

- If successful a green box will appear in the top right-hand corner of the screen saying Success

Please note, that after adding a TXT record it may take up to 4 hours to take effect.
How to manually edit your SPF record in cPanel
If you have an SPF record but it is incorrect or you have been advised to update it, you can do so in the Zone Editor.
- In the cPanel main menu click Zone Editor

- To the right of the domain click Manage
- Next to Filter: click TXT

- Scroll down to find your SPF record
You can edit or delete it

Please note, that after making any changes to your TXT record it may take up to 4 hours to take effect.
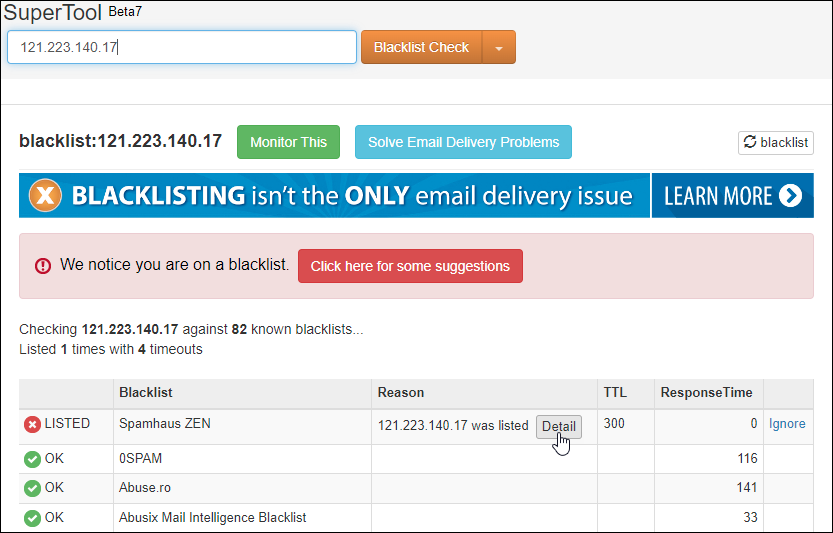
Blacklists
A blacklist is a list of blocked domains, email addresses or IP addresses. If your domain or IP address is on a blacklist, it can cause your sent emails to go to the recipient's spam or Junk folder or be rejected by the server. You can use a tool called MX Toolbox to check whether you are on a blacklist or not.
Check your domain for blacklists
- Go to MX Toolbox Blacklists tool (click here)
- Under Server IP or Domain, search your domain name
- Click Blacklist Check

- Check the results
Blacklists will show up as a red x at the top of the list. You can click on the blacklist for additional details. This will often tell you how to delist your IP address from a blacklist.
Check your network IP address for blacklists
- Use whatismyipaddress.com to find your IPv4 (do NOT use IPv6)
- Copy your IPv4 and go to MX Toolbox Blacklists
- Under Server IP or Domain, paste your IPv4
- Click Blacklist Check

- Check the results
Blacklists will show up as a red x at the top of the list. You can click on the blacklist for additional details. This will often tell you how to delist your IP address from a blacklist.
You may need to contact your internet provider (e.g., Telstra, Optus, Dodo etc.) to have certain blacklists removed.