
Configuring SSH access in the Hosting Panel
Learn how to set up SSH access for your account from one convenient interface in the Webcentral Hosting Panel. This article describes how to set up key-based and password-based authentication for SSH.
Some newer hosting accounts use an administration interface directly within the Webcentral Hosting Panel. Unlike cPanel, there is no separate login — you just log in to your Webcentral account at https://theconsole.webcentral.au and control your web site, email, and WordPress from one unified interface.
This article provides an overview on how to use this administration interface to configure SSH access to your account. It applies to the following account types:
- Mini Web Hosting
- Starter Web Hosting
- Plus Web Hosting
- Pro Web Hosting
- Max Web Hosting
- Hosting for WordPress
NoteYou can configure key-based authentication, password-based authentication, or both. This article shows you how to set up both methods.
Configuring SSH key authentication
You can enable SSH key access for your account. However, before you follow the procedure below, make sure you generate a key pair (public key and private key) first.
To enable key-based SSH access to your account, follow these steps:
-
Log in to your account as described in Managing your website in the Hosting Panel.
-
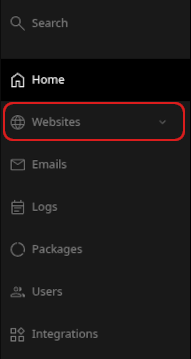
When the control panel appears, in the left sidebar, click Websites:
-
On the Manage websites page, click the website you want to manage.
-
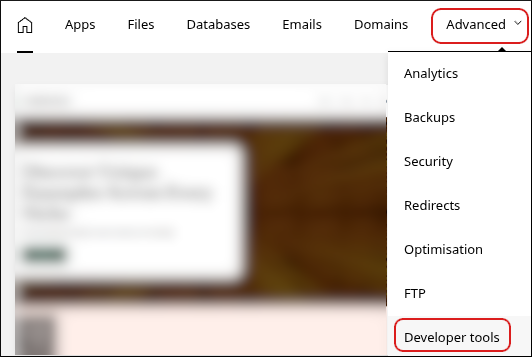
A list of tabs appears at the top of the page. Click the Advanced tab, and then click Developer tools:
-
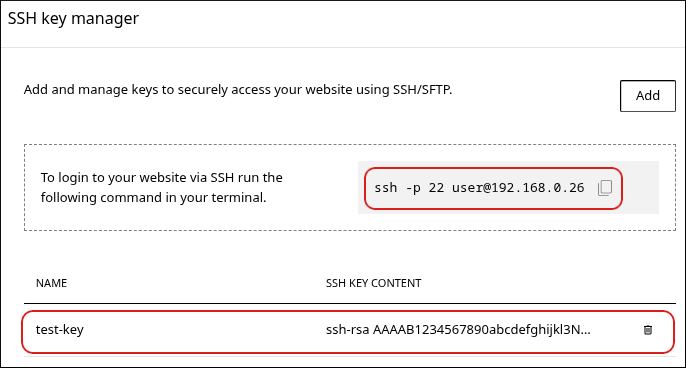
The Developer tools page appears. In the left sidebar, click SSH key manager:

-
Click Add.
-
In the Name text box, type a descriptive name for the key.
-
In the Public key text box, paste the text of the public key. Alternatively, you can upload the public key file directly by clicking Upload file.
ImportantThe public key filename usually ends with a .pub extension. Make sure you upload your public key, and not your private key!
-
Click Upload. The key and the SSH command to access your account appear:
 Note
Note- You can add multiple keys for your account. To do this, click Add, and then repeat steps 7 to 9.
- To delete a key, click the trash can icon, and then click Delete to confirm.
Configuring SSH password authentication
To enable SSH access to your account using a password, follow these steps:
-
Log in to your account as described in Managing your website in the Hosting Panel.
-
When the control panel appears, in the left sidebar, click Websites:
-
On the Manage websites page, click the website you want to manage.
-
A list of tabs appears at the top of the page. Click the Advanced tab, and then click Developer tools:
-
The Developer tools page appears. In the left sidebar, click SSH password authentication:

-
To reset the password, click Reset.
-
In the New password text box, type the password you want to use. Alternatively, click the key icon to automatically generate a strong, random password.
-
Click Save. The new password takes effect immediately.
-
Use the command under Login command to access your account using SSH.