
WordPress Toolkit : How to use the Dashboard
WordPress Toolkit - How to use the Dashboard
Our WordPress Hosting plans have The WordPress Toolkit plugin that is simple console enabling you to easily install, update, backup and manage your WordPress. The WordPress Toolkit in cPanel is designed so that you manage your WordPress installation, however, you will still need to login to your WordPress site to create content and publish updated pages/post. For support on the basic Usage of Wordpress, please see their official article below.
https://wordpress.org/support/category/basic-usage/
The Dashboard
The WordPress Toolkit is a simple interface to let you manage your WordPress site from cPanel. Here we will list and explain what some of the buttons do.
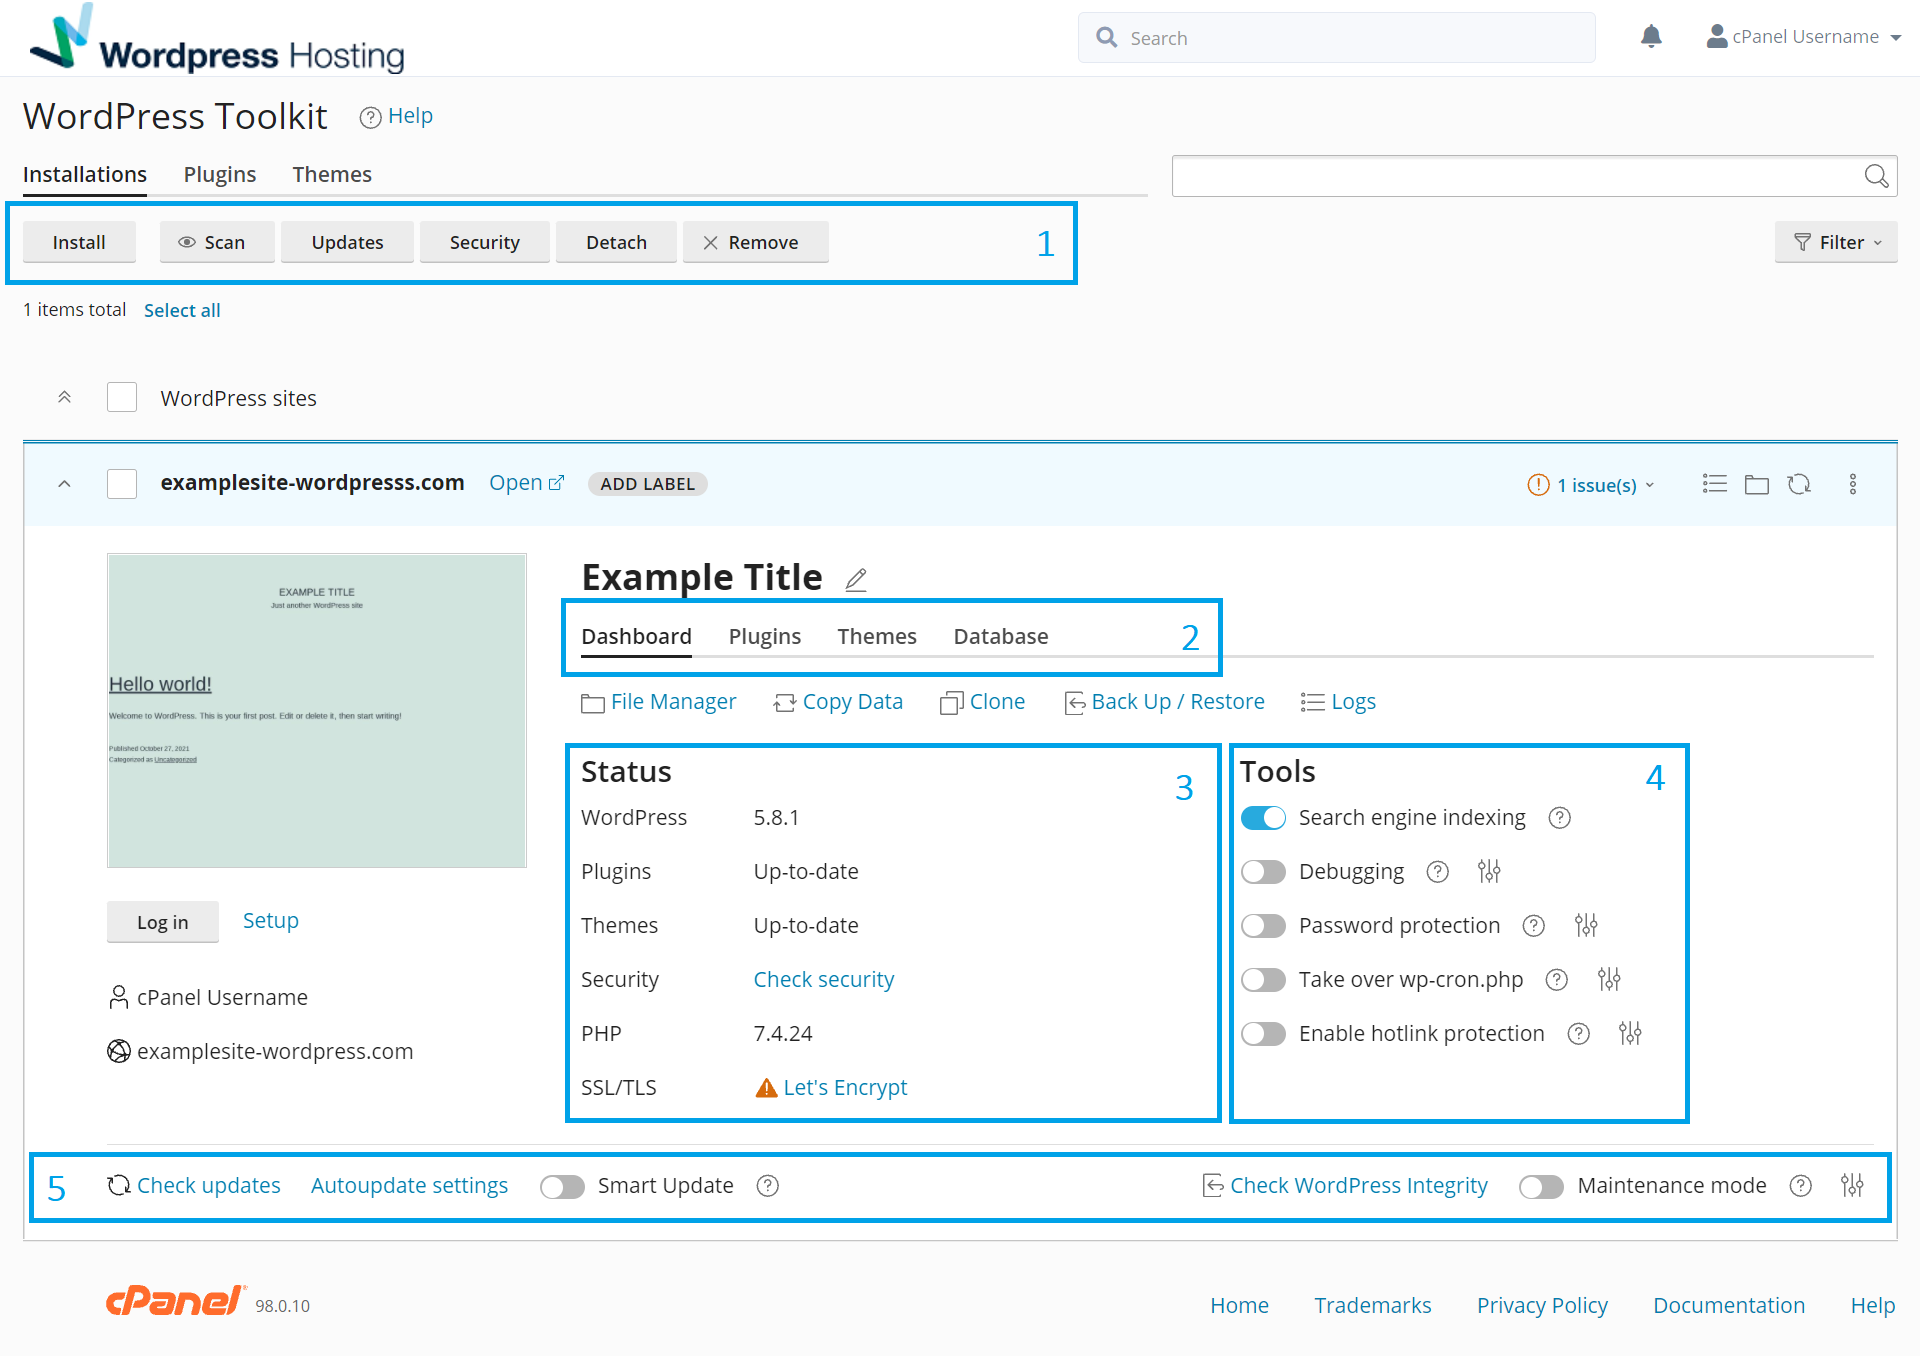
1. Dashboard Toolbar
Installations : These are the domains/sites installed on the WordPress Toolkit.
Plugins : This is where you manage WordPress Plugins.
Themes : This is where you manager WordPress Themes.
Install : This is where you can install a new WordPress Website.1
Scan : Scan the File System for WordPress Installations.
Updates : Check updates for all or selected WordPress Websites.
Security : Check Security of all or selected WordPress Websites.
Detach : Detach the selected WordPress Website from the Toolkit.
Remove : Delete the selected Wordpress Website from the Toolkit.
2. Site Management
Example Title : Select Edit to edit your WordPress Sites Title.
Dashboard : Website Management Area and Status/Tools for the selected WordPress Site.
Plugins : Where you can manage the Plugins for the selected WordPress Site.
Themes : Where you can manage the Themes for the selected WordPress Site.
Database : The Database information of the Selected selected WordPress Site.
File Manager : Access to the cPanel File Manager.
Copy Data : Copy data from another WordPress installation.
Clone : Clone the current WordPress site to another WordPress Site URL.
Back Up/Restore : Create a Backup(Compressed tar.gz) and restore Point for your WordPress Site.
Logs : Logs of all changes made to the WordPress site.
Log in : This will Log you into your WordPress Site from the Toolkit.
Setup : This is where you can update your WordPress Login credentials and Admin Email address.
3. Status
WordPress : 5.8.1 : Give the current WordPress version.
Plugins : Up-to-date : Gives the current status of Plugins versions.
Themes : Up-to-date : Gives the current status of the Themes versions.
Security : Check security : The Option to Check WordPress Security.
PHP : 7.4.24 : Gives the current PHP Version the site is using.
SSL/TLS : Let's Encrypt : Gives the current SSL version the site is using.
4. Tools
Search engine indexing : If your website is not yet ready for public viewing, disable this option to make sure that search engines do not show your website in the list of search results. Disabling this option enables the "Discourage search engines from indexing this site" option in WordPress, which, in turn, adds the "noindex, nofollow" tags to your website's header and adds the Disallow directive to the virtual robots.txt file.
Debugging : If you are creating an installation for testing or development, you may want to enable one or more debug options in WordPress. Debug is disabled by default.
Password protection : Restrict public access to your website by requiring all visitors to provide username and password. This is useful, for example, if your website is work in progress and you only want selected people to be able to view it.
Take over wp-cron.php : WordPress uses its wp-cron.php file for running routine tasks like checking for updates, sending email notifications, and so on. The file is executed every time site visitor loads a page, which can be an issue if there are critical tasks that must run on time. This option will disable the default wp-cron.php execution and provide the means to create a regular scheduled task instead.
Enable hotlink protection : Hotlink protection prevents other websites from displaying, linking or embedding your files (usually images). This practice is called hotlinking, add it can quickly drain your bandwidth and make your website unavailable.
5. Dashboard Footer
Check updates : Submits a request to check for any availible WordPress Updates.
Autoupdate settings : Setup your preferences on Automatic Updates for your WordPress/Plugins/Theme Versions.
Smart Update : Smart Update allows users to test the update of their website, its plugins, and its themes, without actually affecting the website. Smart Update creates a full clone of the website, runs a number of preliminary checks, updates the cloned website, and runs the checks again to see if the update has broken anything. The resulting data is made available to the website owner in the WordPress Toolkit UI, along with a number of before-and-after screenshots for additional visual comparison. The user can then make an educated decision about whether the update should be performed or not, and tell the system to either perform the update on the production website, or discard the update.
Check WordPress Integrity : If you suspect that this site is infected by malware, check the integrity of WordPress core files by verifying them against their reference checksums from wordpress.org. If checksums fail to match, you can quickly reinstall WordPress core files without affecting your site content.
Maintenance mode : When a WordPress website enters maintenance mode, the website's content is hidden from visitors without being changed or otherwise affected. Visitors accessing your website when it is in maintenance mode see the maintenance screen instead of the website content. Your WordPress website enters maintenance mode automatically when you are updating your WordPress website or copying data between WordPress websites via WordPress Toolkit. If you are making changes to your website and want to temporarily hide it from visitors, you can manually put it into maintenance mode.