How to customise the look of your Website Builder website
There are many features within Website Builder that allow users to modify the look and layout of their websites. Below are instructions which explain how to use some of these features.
- How to modify the Wesite Builder template
- How to modify the page layout
- How to add new page
- How to modify CSS
- How to modify the background colour/image
- How to modify the website banner
- How to modify the website header/title
- How to modify the website fonts
- How to modify the website favicon
How to modify the Website Builder template
Website Builder includes a number of design templates that allow users to build their websites starting with a predefined base structure. For instructions on how to select and further modify and customise the templates included within Website Builder, please refer to our support article.
How to modify the the page layout
There are several pre-formatted page layouts available for users to select from. WebsiteBuilder allows users to apply page layouts to each theme so that their content is laid out in a format that suits them.

- Log into Website Builder
- Click on the Page tab
- Select the specific page you wish to modify the layout of from the drop down menu on the left
- Click Layout
- Select a page layout from the list of options. You can trial them before settling on one and you won't lose your content, it will just move to fit each layout
How to add a new page
You can have as many pages on your website as you like. Just remember, sometimes less is more
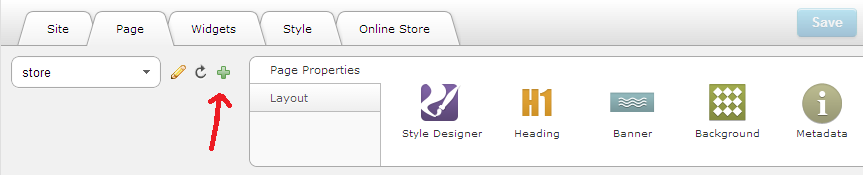
- Log into Website Builder
- Click on the Page tab
- Next to the drop down menu there is a small pencil, a circular arrow and a green plus sign
- Click the green plus sign
- This will bring up a text box that looks like this:
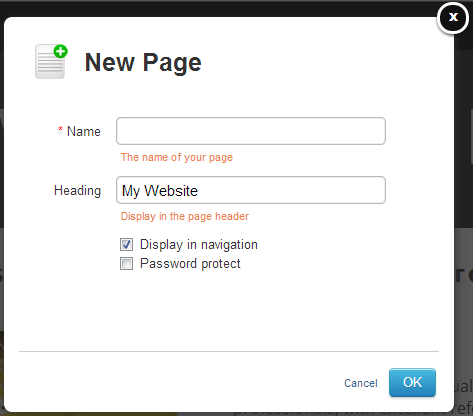
- Fill in the blank text boxes and hit OK
- Your new page will load and you will be able to edit it the same as the other pages
How to modify CSS
Note: The ability to modify CSS is only available on some Website Builder plans. Depending on the Website Builder plan you are using, you may need to upgrade in order to use this feature.
Modifying a websites CSS (Cascading Style Sheet) is a fantastic way to customise a website as it allows users more control over specific changes they wish to make. This feature is best used by advanced users who are comfortable with using HTML code. We can only provide very basic assistance in relation to CSS.
- Log into Website Builder
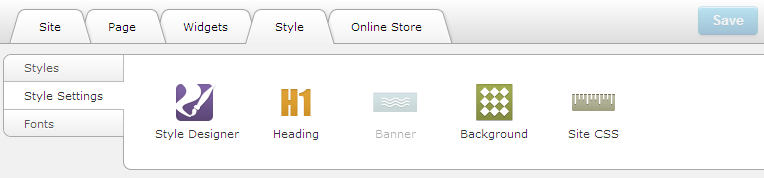
- Click on the Style tab
- Click Style Settings
- Click Site CSS
- If you wish to view/modify any current CSS information, we recommend copying it from the Site CSS tab, then pasting the code into the Site CSS Overrides text box
- To preview the changes you are applying, click on the Preview tab
How to modify the background colour/image
The ability to modify the background colour or background image used on a template is only available on some Website Builder templates. Certain templates do not allow users to modify the background settings. In order to modify the colour or image used in the background of a Website Builder website, follow the steps below.
- Log into Website Builder
- Click on the Style tab
- Click on Style Settings
- Click on Background
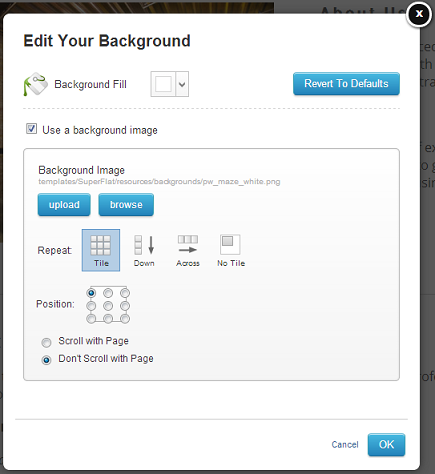
5. Use Background Fill to choose a colour or you can use a background image, which you can upload from your computer
6. Once you've hit ok, you'll have access to a toolbar that looks like this:
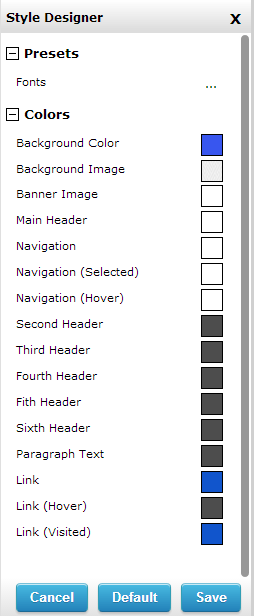
7. If you click on the coloured boxes, you can change the colours of these individually and click 'Save' to bring them into effect
8. If you want to revert to Default at any time, click the 'Default' button to undo your changes.
How to modify the website banner
The ability to modify the website banner image is only available when using Website Builder templates which allow this option. Some Website Builder templates do not include a banner image. To modify the banner image being used on a template, follow the steps below.
- Log into Website Builder
- Click on the Style tab
- Click on Style Settings
- Click on Banner
- A window will pop up, use this to upload images or use images from the default gallery
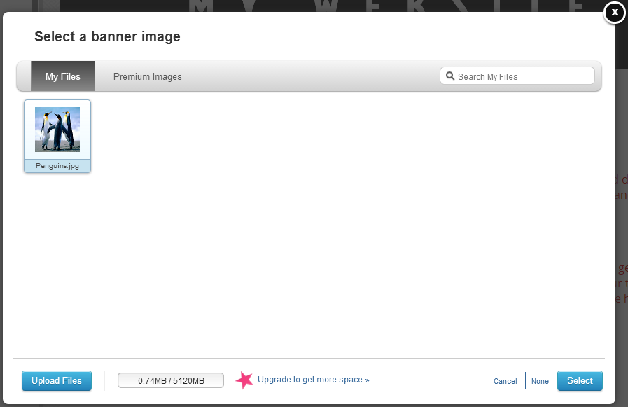
6. Hit save to load your banner image
How to modify the website header/title
Users can add a title/heading to each page on their website by following the steps below.
- Log into Website Builder
- Click on the Style tab
- Click on Style Settings
- Click on Heading
- Type your new website header/title into the text boxes and click Save
How to modify the website fonts
Modifying the fonts under Style Settings will only modify the fonts used for text in a websites menus and other shared areas of a website. All text which is inserted into Website Builder via a text box will have separate controls/options for handling fonts.
- Log into Website Builder
- Click on the Style tab
- Click on Style Settings
- Select a font set from the available options
How to modify the website favicon
A favicon is a small image associated with your website. When set, it displays in the website browser address bar, tab and when the website is bookmarked. For example, the Netregistry logo appears as the favicon for the Netregistry website. The favicon selected will be automatically be set on every page of a Website Builder website. To set your own favicon, follow the steps below.
- Log into Website Builder
- Click on the Site tab
- Click on Site Properties
- Click Favicon
Updated 2 months ago