Apple Mail (OS X Leopard 10.5) email setup tutorial
Before you can configure email software to send and receive emails from our servers, you must
- Purchase a cPanel or Cloud hosting subscription service
- Create an email account on our cPanel or Cloud hosting servers
- Ensure you have your incoming, outgoing, username and password details ready to go
Once you have done this, you can configure your email software to connect to the email account you created on our servers.
Note: The default Apple Mail (or Mac Mail) application has several known issues, including not saving settings during setup, losing settings randomly and having issues with connecting several devices to the same email account. Unfortunately these are intermittent issues with the software itself, if you encounter these we recommend switching to Thunderbird or Outlook for Mac.
Setup email account using Apple Mail OS X Leopard 10.5
- Click Mail from the menu bar
- Select Preferences
- Click the Plus [+] icon located at the bottom left corner of the Accounts window
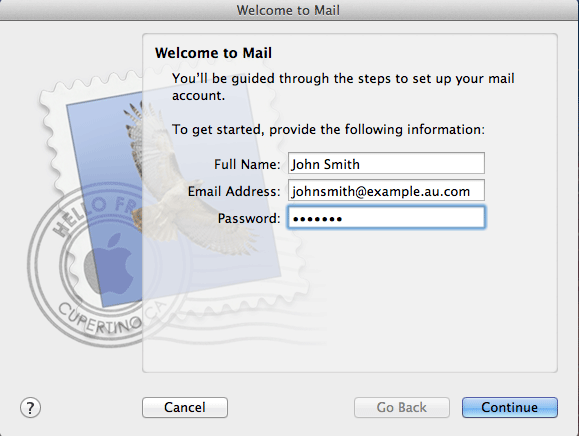
4. Complete the following information:
Full Name: The name displayed to the email recipient
Email Address: The email account you wish to connect to
Password: Email account password
5. Click [Continue]
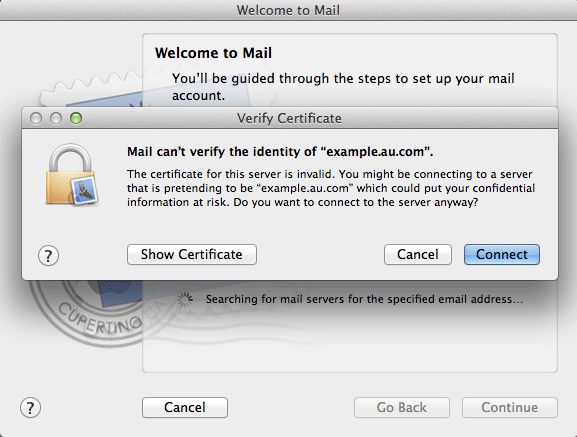
You may be greeted with a pop up stating that Apple Mail can't verify the identity of your domain. You can simply click [Connect] to continue
Read through our SSL on shared email servers support page for more information about these warnings
6. You'll next be asked to enter your incoming mail server details
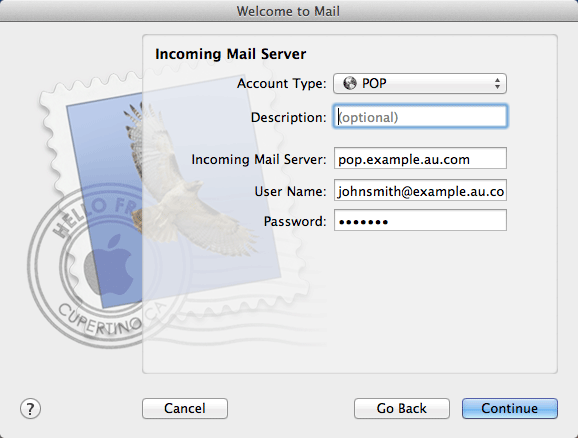
Complete the following information:
Account Type: Select POP or IMAP (for the purpose of this tutorial, we are using POP)
Description: May be any descriptive text (this is for your own use only and has no effect on your configuration)
Incoming mail server: pop.your-domain.tld or imap.your-domain.tld (depending on whether you are using POP or IMAP
User Name: The email address of the account you wish to connect to
Password: The password used for this email account
7. Click [Continue]
You may get another warning message about Apple Mail not being able to verify the identity of the server you are attempting to connect to. Simply click [Connect] to continue
8. You'll next be asked to enter in your outgoing mail server details
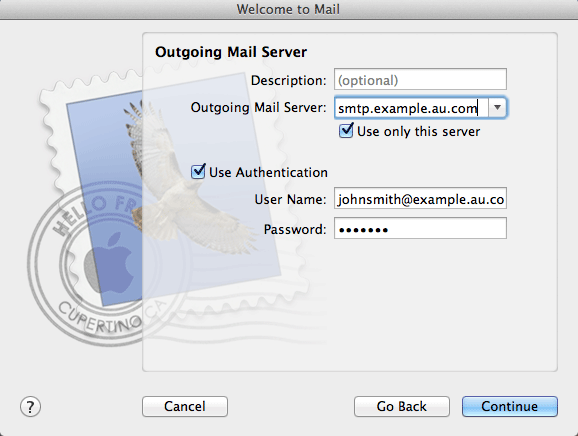
Complete the following information:
Description: May be any descriptive text
Outgoing mail server: smtp.your-domain.tld
Use only this server: Tick this box if this is the primary email address you'll be using within Apple Mail
Use Authentication: Tick this box
User Name: The email address of the account you wish to connect to
Password: The password used for this email account
9. Click [Continue]
The next screen will display a summary of your settings
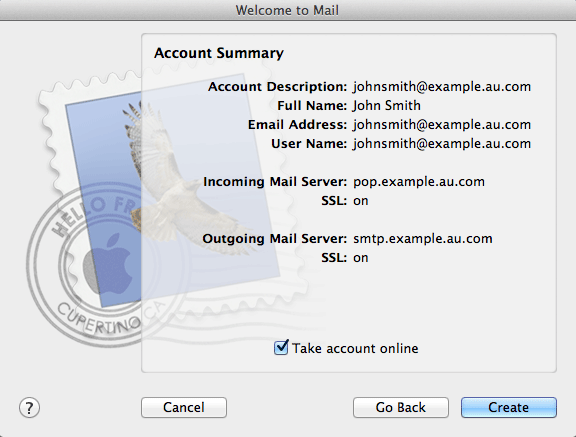
10. Review the settings you've selected and click [Create]
11. Your Apple Mail account should now be ready to use
Apple Mail OS X Leopard 10.7 Troubleshooting
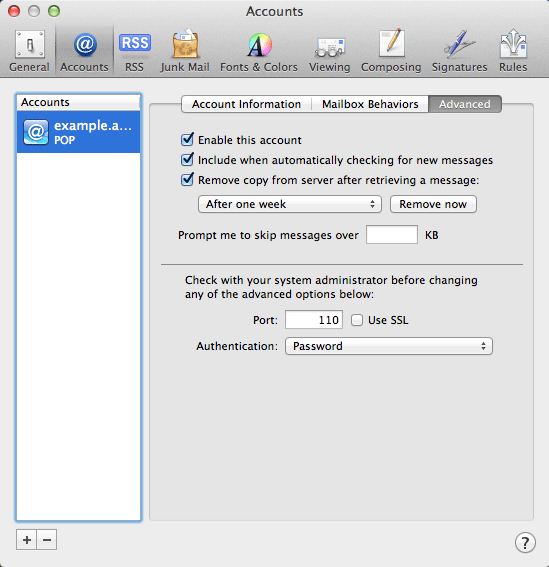
Common issues in Apple Mail are caused by the software auto-selecting users SSL and port number settings. If you are getting errors, double check that you are using the correct SSL and port number settings
- To check and modify the SSL and port settings for incoming mail, select the account you wish to make changes to from the left hand Accounts column, then click on the Advanced tab
- From the Advanced tab, you'll be able to modify the port, SSL and Authentication settings. To determine which specific settings you should use, feel free to read through our Email software settings support article
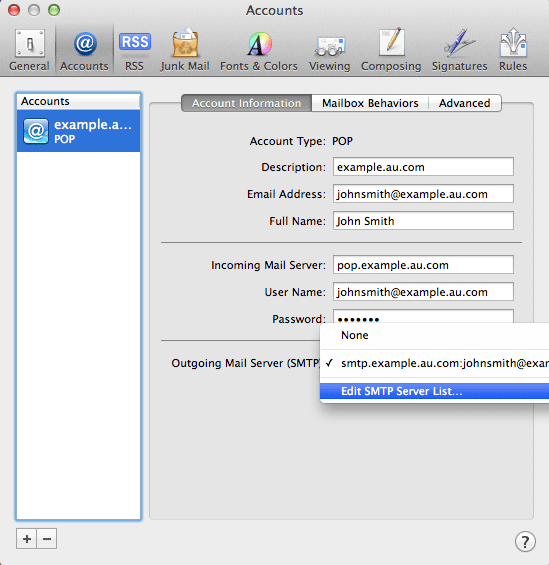
3. To modify the outgoing mail server settings, select the account you wish to make changes to from the left hand Accounts column
4. Next click on the Outgoing Mail Server currently being used
5. Select Edit SMTP Server List... from the drop down menu
6. Select the outgoing mail server you wish to modify from the list provided
7. Click the Advanced tab
8. From the Advanced tab, you'll be able to modify the port, SSL and Authentication settings. To determine which specific settings you should use, feel free to read through our Email software settings support article
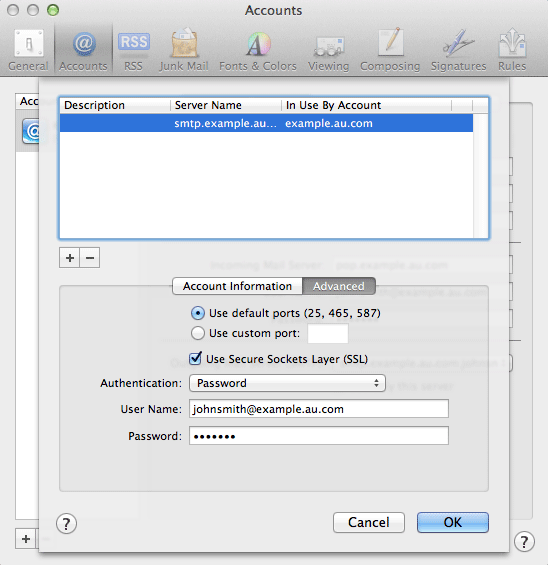
9. Once you have completed making changes, click [OK]
If you experience any issues setting up your Apple Mail, click here for troubleshooting help.
Updated 2 months ago