> ## Documentation Index
> Fetch the complete documentation index at: https://support.webcentral.au/llms.txt
> Use this file to discover all available pages before exploring further.
# AI Sitebuilder and AI Storebuilder
> Learn how to use Webcentral AI Sitebuilder and AI Sitebuilder Store to quickly and easily build eye-catching, full-featured websites.
Our AI Sitebuilder products enable you to build a professional-looking online presence with speed and simplicity. You do not need to have any previous web design experience to take full advantage of AI Sitebuilder's rich feature set for developing websites.
We offer two tiers of AI Sitebuilder:
* **Webcentral AI Sitebuilder** provides an easy way to build a complete web site. With themes, widgets, and AI-enhanced tools ready to help, you can quickly get your project up and running.
* The Webcentral AI Sitebuilder tier also offers a **Starter** plan for domain-only purchases. With the Starter Plan, you can create a simple one-page website for your domain.
* You can upgrade any **AI Sitebuilder** plan to any **AI Sitebuilder Store** plan.
* **Webcentral AI Sitebuilder Store** includes all of the features of the AI Sitebuilder Max plan, and adds many other features to help you build and maintain an online business.
## Building a site
To access AI Sitebuilder and begin building your site, follow these steps:
1. Log in to the Hosting Panel at [https://theconsole.webcentral.au](https://theconsole.webcentral.au).
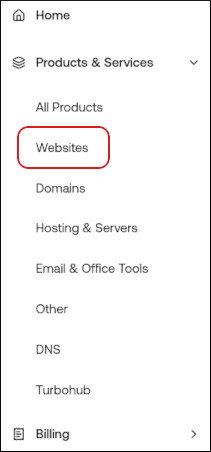
2. In the left sidebar, under **Products & Services**, click **Websites**:
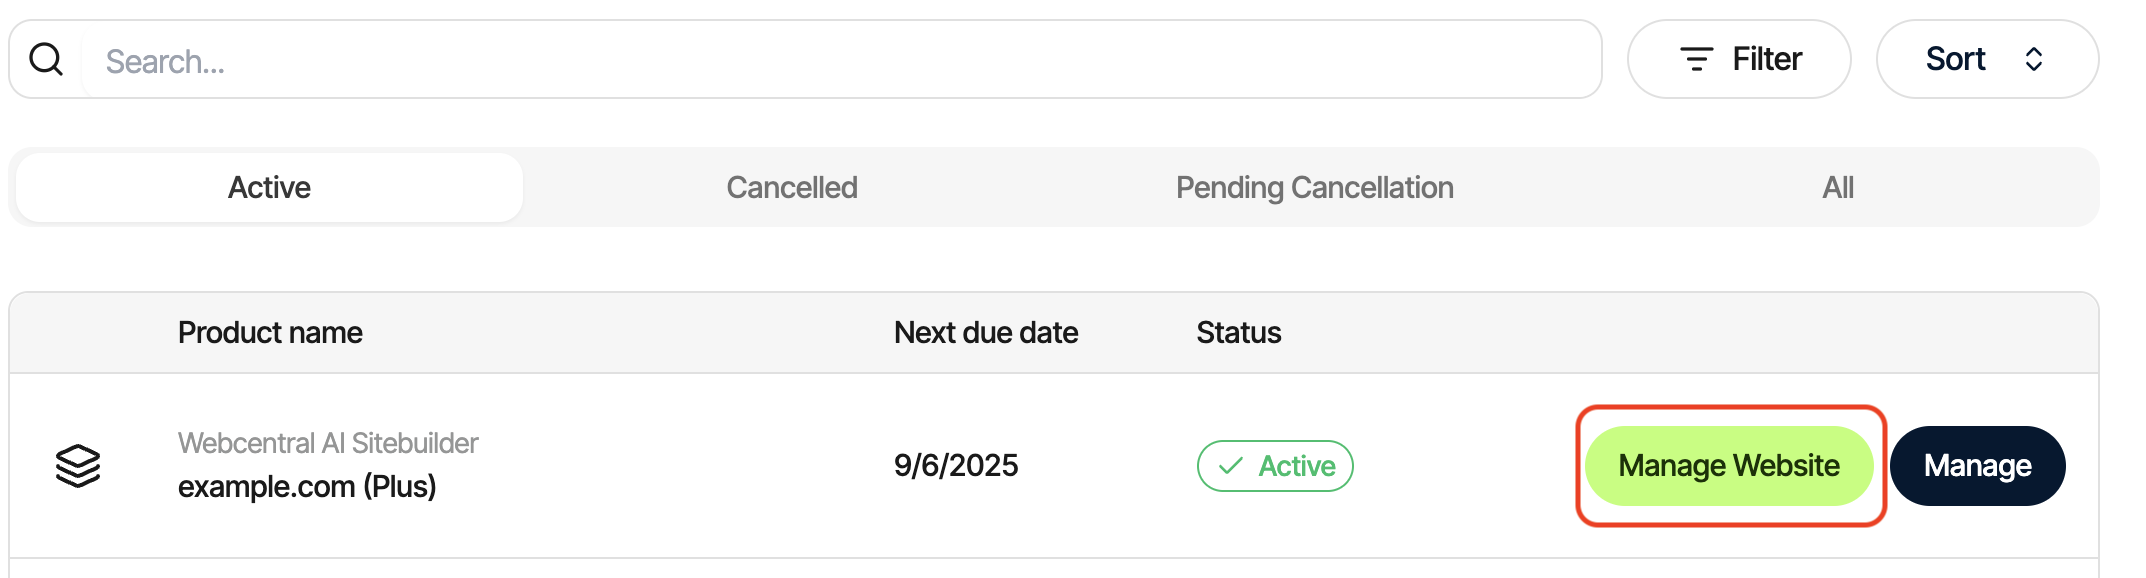
3. On the **Hosting & Servers** page, locate your Webcentral AI Sitebuilder product, and then click **Manage Website**:
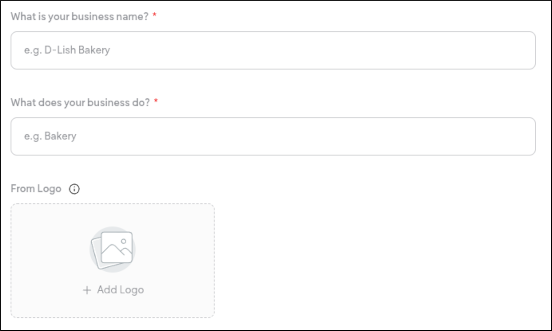
4. The Site Builder interface opens in a new tab. On the **Let's start with the basic info** page, provide the following information:
* The business or organization name.
* A description of what the business or organization does.
* An image file of the logo for the business or organization. You can use the PNG or JPEG file format.
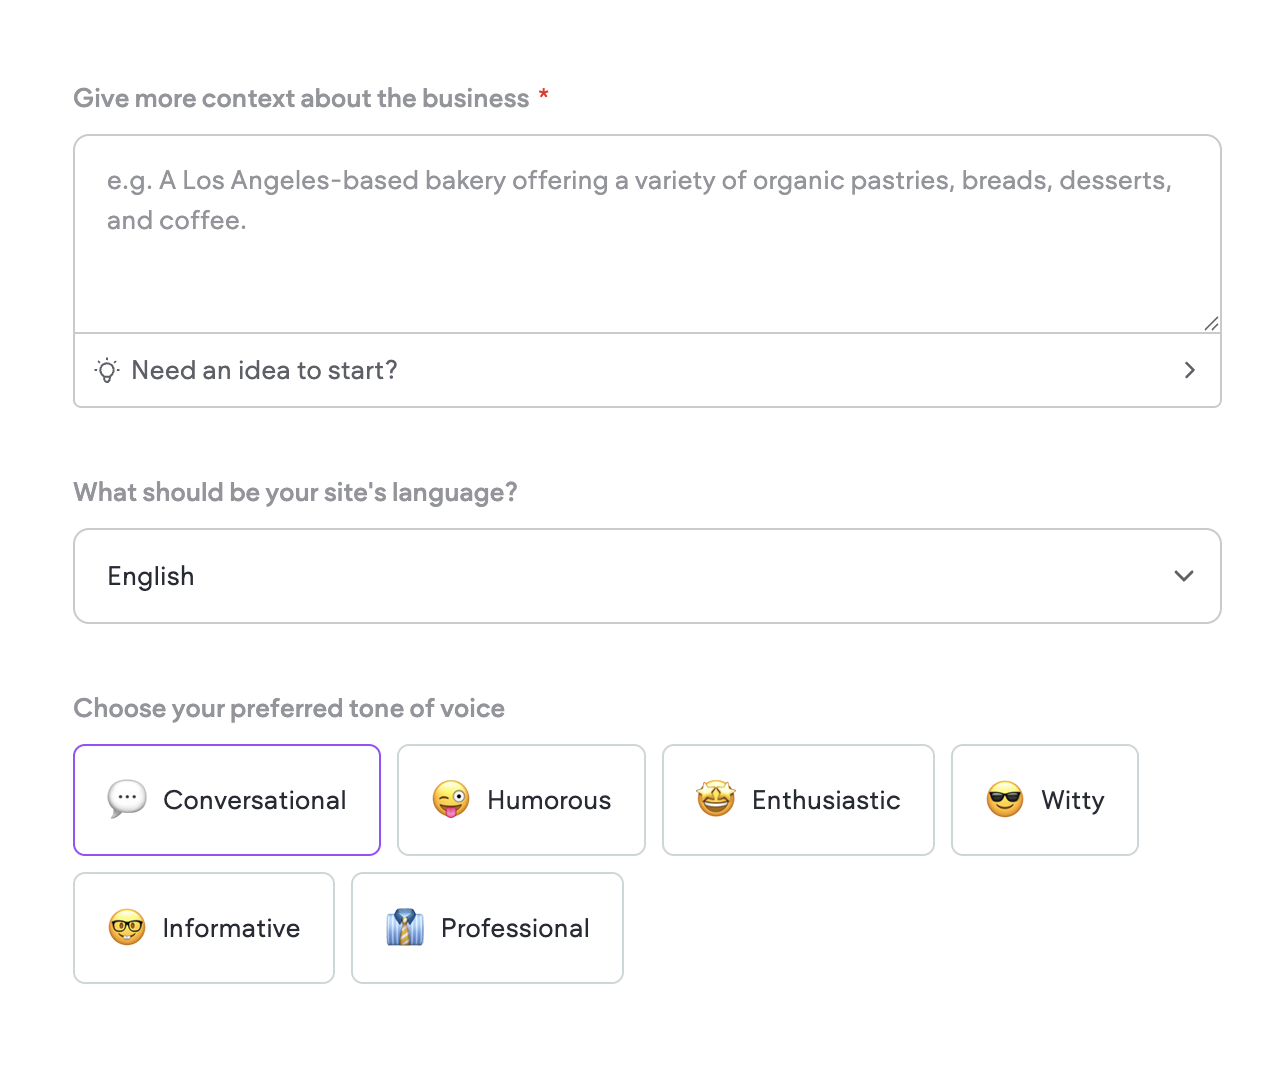
5. Click **Next**. On the **Additional info & preferences** page, provide the following information:
* Additional context about the business or organization. The more context you can provide for the AI agent, the better the results.
* The site language.
* The preferred tone of voice.
6. Click **Next**.
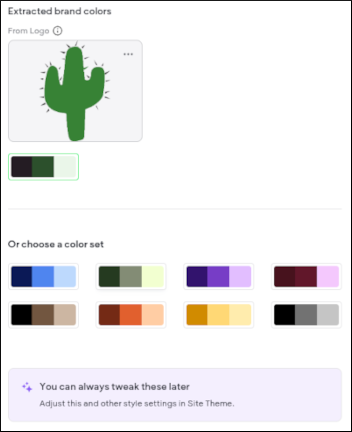
7. On the **Choose your theme** page, select a color set, and then click **Next**:
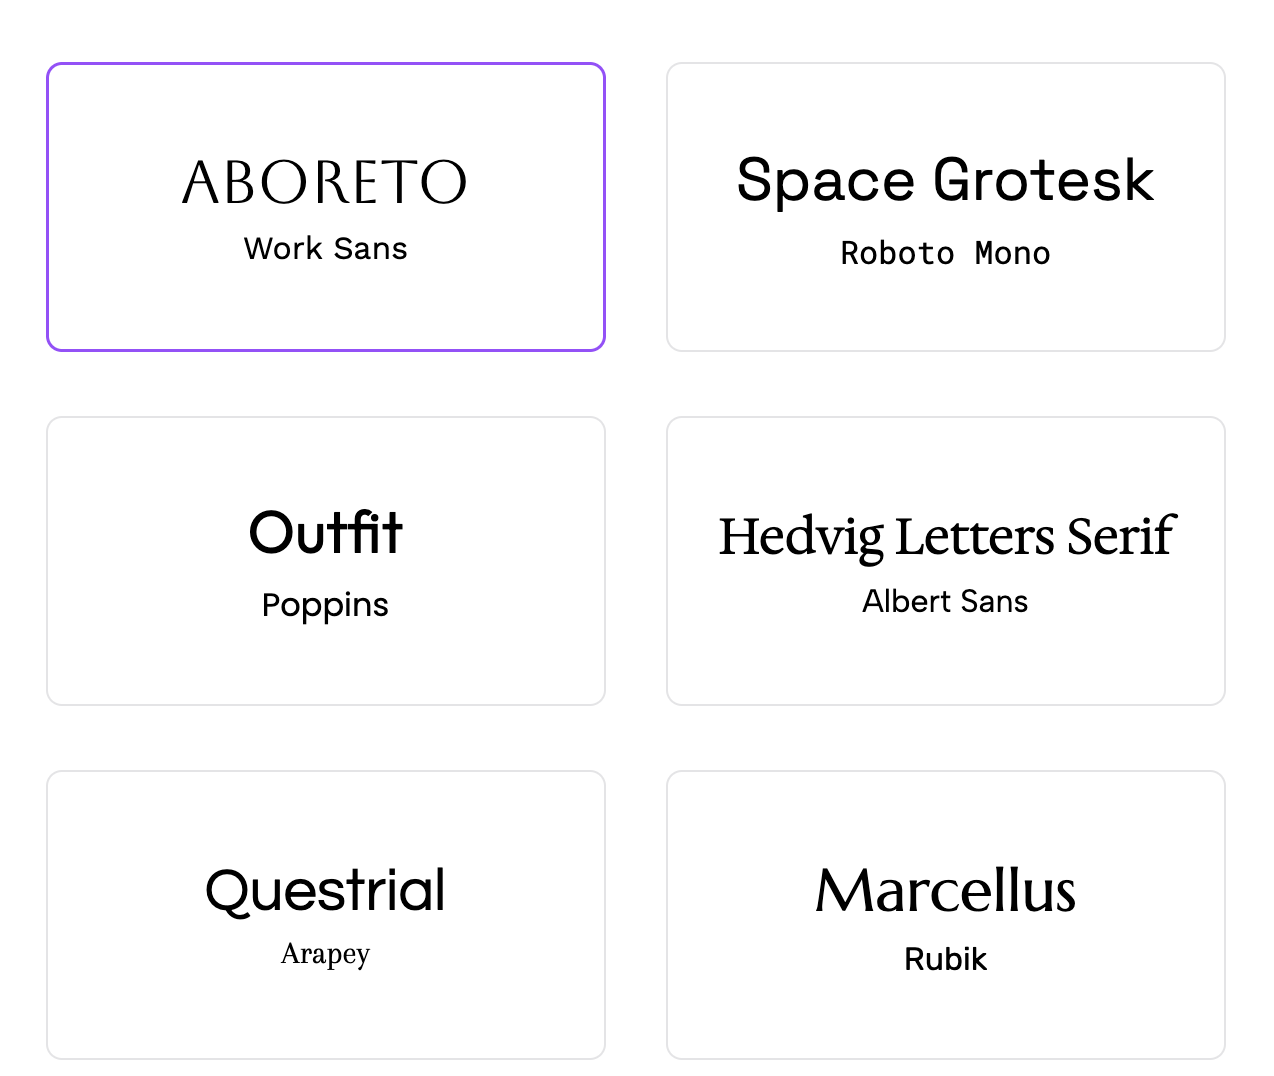
8. Select a font set, and then click **Next**:
9. AI Sitebuilder generates an initial site design based on your responses. Go to the next section for information about how to customize this initial site design.
## Customizing site design and content
After AI Sitebuilder completes the initial site design, you are ready to use the page builder and editor to customize the design and content further. To do this, follow these steps:
1. In the page builder, you can adjust the site content and layout:
* To select a site page or create a new page, click the page list:
* To regenerate an entire page, click one of the following options:
* **Regenerate Page**. This option generates a new page using the suggested layout.
* **Regenerate Page Content**. This option enables you to regenerate only the images, or the text and images.

* You can add, regenerate, and remove sections in a page by clicking a section and then selecting the option you want:

* AI Sitebuilder uses responsive design to make sure your site looks good on different devices and screen resolutions. To view how your site will look on different devices, click a device icon. You can view desktop, tablet, and mobile versions of your site:

2. When you are satisfied with the site design, click **Continue to Editor**.
3. In the Editor's left sidebar, there are many tools for customizing your site further:
* **Theme**: In this section you can customize the site colors, font, and more. For more information, please see [https://support.multiscreensite.com/hc/en-us/articles/27338180634135-Site-Theme](https://support.multiscreensite.com/hc/en-us/articles/27338180634135-Site-Theme).
* **Pages**: In this section you can reorder, manage, and create pages for your site. For more information, please see [https://support.multiscreensite.com/hc/en-us/articles/27338181422231-Pages](https://support.multiscreensite.com/hc/en-us/articles/27338181422231-Pages).
* **Widgets**: In this section you can use a wide variety of building blocks to add functionality to your site. For more information, please see [https://support.multiscreensite.com/hc/en-us/articles/27338864540695-Widgets-Library-and-Overview](https://support.multiscreensite.com/hc/en-us/articles/27338864540695-Widgets-Library-and-Overview).
* **Media**: In this section you can choose from a wide selection of curated images to use in your site. For more information, please see [https://support.multiscreensite.com/hc/en-us/articles/32002179287959-Media-Panel](https://support.multiscreensite.com/hc/en-us/articles/32002179287959-Media-Panel).
* **Sell Online**: In this section you can set up and configure an online shop, including products, catalogs, payment gateways, and shipping. For more information, please see [https://support.multiscreensite.com/hc/en-us/sections/27339200934295-Store-Overview-and-Set-Up](https://support.multiscreensite.com/hc/en-us/sections/27339200934295-Store-Overview-and-Set-Up).
* **SEO & Settings**: In this section you can configure [SEO (Search Engine Optimization) settings](https://support.multiscreensite.com/hc/en-us/articles/27338202495639-Site-SEO-Settings), [URL redirects](https://support.multiscreensite.com/hc/en-us/articles/27338206395415-URL-Redirects), [site backups](https://support.multiscreensite.com/hc/en-us/articles/27338201907351-Backup-Sites), [Google Tools](https://support.multiscreensite.com/hc/en-us/articles/27338169825431-Google-Tools), and more.
For information about other features in the editor, click the help icon:

4. To preview your site, click **Preview**:

When you are satisfied with the site content, go to the next section for information about how to publish your site.
## Publishing a site
After you customize the site design and content, you are ready to publish your site and make it live. To do this, follow these steps:
1. To publish your site, click **Publish**:

After AI Sitebuilder publishes your site, it displays your site's web address.
2. To update your published site after you make changes, click **Republish**:

For new domains, you do not need to do any DNS configuration when you publish your site — AI Sitebuilder sets up your domain for you automatically. However, if you have previously used your domain for other services or are not using the default nameservers, you may need to connect your domain manually to AI Sitebuilder. For information about how to do this, go to the ["Option 2: Manual Connection" section of this article](https://support.multiscreensite.com/hc/en-us/articles/27338190360855-Make-Your-Site-Live-Initial-Steps-and-DNS-Record-Setup).
## Frequently Asked Questions
### Is my site protected by SSL?
Yes, when you publish your site we generate and install an SSL certificate automatically.
### Can I use languages other than English?
Yes, you can provide prompts in languages other than English and the AI agent will respond accordingly.
### How can I add embedded code to my site pages?
There are two ways to add custom HTML or JavaScript to a site page:
**Method #1: Use the HEAD HTML option**
1. In the editor, in the left sidebar, click **SEO & Settings**.
2. Click **HEAD HTML**.
3. In the **Body end HTML** section, you can add custom HTML or JavaScript just before the closing ` ` element of each page.
4. In the **Head HTML** section, you can add custom HTML or JavaScript to the `